
ブログ等のレイアウトのアクセントに、会話風の吹き出しにしたいことってないですか?
HTMLとCSSで作ってみましたので公開します。
WordPressや各種ブログサービスの投稿画面で、そのままコピペするだけで使えます!ただし、CSSは、<style>...</sytle>タグで挟んでくださいね。
WordPressなら「投稿の編集」画面の「テキスト」タブで、はてなブログなら「記事を書く」画面の「HTML編集」タブで、アメーバブログなら「ブログを書く」画面の「HTML表示」タブで、ペーストしてください。
LINE風
言わずと知れたLINE風です。
表示結果
ソースコード
このスタイルのみ、直径40pxでユーザアイコンの画像をご用意ください。HTMLの<img class="icon" >のsrc値を各自の環境に置き換えてください。
<div class="kaiwa line">
	<div class="name">
		おなまえ
	</div>
	<div class="fukidasi left">
		<img class="icon" src="img/icon.png" alt="">LINE風です。
	</div>
	<div class="fukidasi left">
		続けて喋るとフキダシのしっぽはつきません。
	</div>
	<div class="fukidasi right">
		HTMLとCSSでできます。
	</div>
	<br><!-- 次のフキダシにしっぽをつけたいときはbrを挿入 -->
	<div class="fukidasi right">
		続けても、しっぽをつけたいときは間にbrを入れます。
	</div>
	<div class="fukidasi left">
	 	<img class="icon" src="img/icon.png" alt="">グループじゃないとき。
	</div>
</div>
/*==============
LINE風フキダシ
===============*/
/*フレームとフォント*/
.kaiwa.line {
	width: 100%;
	max-width: 500px;
	margin: 0 auto;
	padding: 10px 0;
	background: #769ece;
	font-family: "ヒラギノ角ゴ Pro W3","Hiragino Kaku Gothic Pro","Helvetica Neue", "Lucida Sans Unicode", "Arial";
	font-size: 16px;
	color: #333;
	line-height: 1.4;
	overflow: hidden;
}
/*フキダシ共通*/
.kaiwa.line .fukidasi {
	position: relative;
	display: inline-block;
	max-width: 192px;
	margin: 8px 0 0;
	padding: 9px 14px;
	border-radius: 19px;
	overflow-wrap: break-word;
	clear: both;
	box-sizing: content-box;/*はてな用*/
}
/*フキダシ左*/
.kaiwa.line .fukidasi.left {
	float: left;
	margin-left: 62px;
	background: white;
}
/*グループのときのフキダシ*/
.kaiwa.line .name + .fukidasi.left {
	margin-top: 5px;
}
/*フキダシ右*/
.kaiwa.line .fukidasi.right {
	float: right;
	margin-right: 12px;
	background: #7adc40;
}
/*相手の名前*/
.kaiwa.line .name {
	clear: right;
	margin-left: 62px;
	color: white;
}
/*ユーザアイコン*/
.kaiwa.line .icon {
	position: absolute;
	width: 40px;
	height: 40px;
	left: -54px;
	top: -2px;
	border-radius: 20px;
}
/*グループのときのユーザアイコン*/
.kaiwa.line .name + .left .icon {
	top: -1.8em;
}
/*しっぽ共通*/
.kaiwa.line .fukidasi::after {
	position: absolute;
	content: "";
	width: 24px;
	height: 36px;
	top: -21px;
}
/*しっぽ左*/
.kaiwa.line .fukidasi.left:after {
	left: -10px;
	border-radius: 18px 0 6px 18px/18px 0 1px 18px;
	box-shadow: -3px -15px 0 -5px white inset;
}
/*しっぽ右*/
.kaiwa.line .fukidasi.right::after {
	right: -10px;
	border-radius: 0 18px 18px 6px/0 18px 18px 1px;
	box-shadow: inset 3px -15px 0 -5px #7adc40;
}
/*フキダシが続いてしっぽがないとき*/
.kaiwa.line .left + .left::after,
.kaiwa.line .right + .right::after {
	content: none;
}
ブログサービスで使った場合のサンプルはこちらでご確認いただけます。
→自炊自賛アメブロ支店
→自炊自賛はてな支店
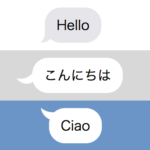
iPhoneのメッセージ風
iPhoneのメッセージアプリ風です。
表示結果
ソースコード
<div class="kaiwa imessage">
	<div class="fukidasi left">
		iPhoneのメッセージ風。
	</div>
	<div class="fukidasi right notail">
		右側のフキダシ。
	</div>
	<div class="fukidasi right">
		上のフキダシのようにしっぽをつけないときはクラスnotailを追加してください。
	</div>
</div>
/*===================
iPhoneのメッセージ風
=====================*/
/*フレームとフォント*/
.kaiwa.imessage {
    width: 100%;
    max-width: 500px;
	margin: 0 auto;
	padding: 10px 0;
	border: 1px #ddd solid;
	background: white;
	font-family: "ヒラギノ角ゴ Pro W3","Hiragino Kaku Gothic Pro","Helvetica Neue", "Lucida Sans Unicode", "Arial";
	font-size: 16px;
	color: #333;
	line-height: 1.4;
	overflow: hidden;
}
/*フキダシ共通*/
.kaiwa.imessage .fukidasi {
	position: relative;
	display: inline-block;
	max-width: 192px;
	margin: 1px 10px 6px;
	padding: 9px 14px;
	border-radius: 19px;
	overflow-wrap: break-word;
	clear: both;
	box-sizing: content-box;/*はてな用*/
}
/*しっぽをつけないとき*/
.kaiwa.imessage .fukidasi.notail {
	margin-bottom: 0;
}
/*フキダシ左*/
.kaiwa.imessage .fukidasi.left {
	float: left;
    background: #e9e9ed;
}
/*フキダシ右*/
.kaiwa.imessage .fukidasi.right {
	float: right;
    background: #2793fa;
    color: white;
}
/*しっぽ共通*/
.kaiwa.imessage .fukidasi::after {
	position: absolute;
    content: "";
    width: 17px;
    height: 17px;
    bottom: 0;
}
/*しっぽ左*/
.kaiwa.imessage .fukidasi.left::after {
    left: -6px;
    border-radius: 0px 0  17px 0px/ 0px 0 13px 0;
    box-shadow: -14px 2px 0 -3px #e9e9ed inset;
}
/*しっぽ右*/
.kaiwa.imessage .fukidasi.right::after {
    right: -6px;
    border-radius: 0px 0  0 17px/ 0px 0 0 13px;
    box-shadow: 14px 2px 0 -3px #2793fa inset;
}
/*しっぽをつけないとき*/
.kaiwa.imessage .fukidasi.notail::after {
	content: none;
}
画像添付した場合や、iPhoneの見た目そっくりそのままのインタフェースも再現したいなら、下の記事で紹介していますので参考にしてみてください。
-
-
Webページで iPhoneのメッセージ画面を再現する
iPhoneのメッセージの画面をHTMLとCSSでブログ等のWebページに再現する方法。 画像として記事に表示させるんだったら、スクリーンショットを撮って配置すれば比較的簡単。下の画像が ...
続きを見る
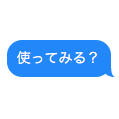
オリジナル
自炊自賛オリジナルのフキダシです。このブログでこれをアレンジして使ってます。
表示結果
ソースコード
<div class="kaiwa mystyle">
	<div class="fukidasi left">
		オリジナルの会話風フキダシです。長く喋れば横幅いっぱいに広がります。
	</div>
	<div class="fukidasi right">
		右側のフキダシです。
	</div>
</div>
/*================
マイスタイル
==================*/
/*フレームとフォント*/
.kaiwa.mystyle {
    width: 100%;
    max-width: 500px;
	margin: 0 auto;
	padding: 10px 0;
	background: #ddd;
    font-family: "ヒラギノ角ゴ Pro W3","Hiragino Kaku Gothic Pro","Helvetica Neue", "Lucida Sans Unicode", "Arial";
    font-size: 16px;
    color: #333;
    line-height: 1.4;
	overflow: hidden;
}
/*フキダシ共通*/
.kaiwa.mystyle .fukidasi {
	position: relative;
	display: inline-block;
	max-width: 100%;
	margin: 10px 20px;
	padding: 9px 14px;
	background: white;
	border-radius: 19px;
	overflow-wrap: break-word;
	clear: both;
	box-sizing: content-box;/*はてな用*/
}
/*フキダシ左*/
.kaiwa.mystyle .fukidasi.left {
	float: left;
}
/*フキダシ右*/
.kaiwa.mystyle .fukidasi.right {
	float: right;
}
/*しっぽ共通*/
.kaiwa.mystyle .fukidasi::after {
	position: absolute;
	content: "";
	width:26px;
	height:26px;
	top: 5px;
}
/*しっぽ左*/
.kaiwa.mystyle .fukidasi.left::after {
	left: -22px;
	border-radius: 0 0px 10px 16px;
	box-shadow: -8px -14px 0 -8px white inset;
}
/*しっぽ右*/
.kaiwa.mystyle .fukidasi.right::after {
	right: -22px;
	border-radius: 0 0px 16px 10px;
	box-shadow: 8px -14px 0 -8px white inset;
}
なお、それぞれのフキダシの形をどういう方法で作っているか、については下の記事で解説しています。
-
-
【CSS】box-shadowプロパティでフキダシのしっぽいろいろ
CSS3で新たに追加されたプロパティを用いれば、かつては画像を用意しなければできなかったようなさまざまな表現が可能です。 この記事では、会話風のフキダシをHTMLとCSSで表現するときの ...
続きを見る
どなたかのお役に立てば。